Friday, June 27, 2014

Stan's confusing coat

My recent sprite fixes PR includes a change that fixes the appearance of Stan (see the GitHub issue here). I found the method they used to produce the unmoving plaid effect quite interesting, so here's a quick summary.

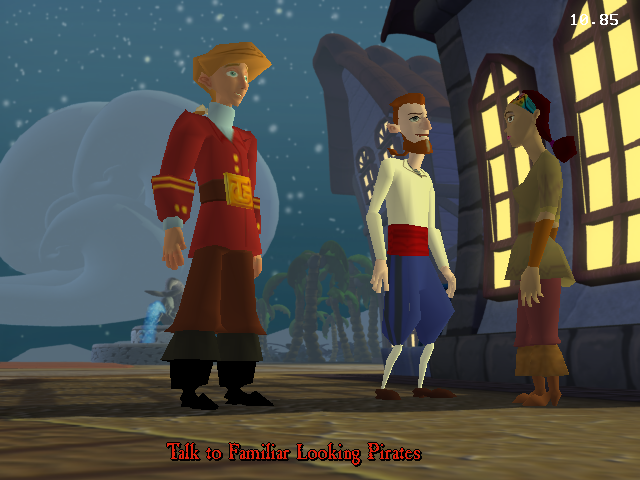
This is the final composition for reference. Note Stan's trademark: the pattern on his jacket does not obey perspective. Although the effect looks simple, achieving this result with fixed-function OpenGL is actually not very straightforward. Let's see how this image is produced.

If we render the first background layer only, we can make an interesting observation. A rectangle covered with the check pattern of Stan's jacket is part of the background. It covers all of Stan's screen-space area. Stan moves back and forth during dialogue, but never leaves the area covered by this rectangle.

Here is a render with only the character models on a black background. We can immediately see that the jacket is not part of the model. Instead, Stan has a fully transparent texture where the jacket should be, so we can see through him. The transparent jacket is still drawn to the depth buffer, though.

If we combine the first background layer and the character models we get a result like above. Since Stan's model is partly transparent we can see the check-patterned background through him. Obviously something still needs to be done about the rest of the rectangle surrounding him.

Above is an additional render with the rest of the background layers enabled. The desk is part of a background layer that is drawn over Stan, covering his legs. This image is similar to what ResidualVM produced before my fixes.

Here's the trick. A sprite is rendered behind Stan, but over the background layer. I highlighted the sprite with red color in the above screenshot to make it stand out from the rest of the background. The sprite contains a chunk of the "real" background without the check-patterned rectangle. Since the sprite is drawn with depth test enabled, the sprite only covers Stan's surroundings but not Stan himself.

This sprite was previously not drawn at all in ResidualVM, so the check-patterned rectangle was not replaced by the correct background around Stan.

This method works nicely since the backgrounds are static and the camera never moves. Other than a bit of overdraw, there's also no additional rendering cost.


Friday, June 20, 2014

The most obscure bug fix yet

After finishing the lighting task, I had some time to focus on fixing bugs before moving on to my after mid-term tasks.

One of my GSoC mentors, chkr brought up a bug regarding the candles in Governor's mansion. In ResidualVM, the candle sprites didn't show up at all. Look at the chandelier in the screenshots below to see the difference. ResidualVM on the left, original on the right.


 This seemed simple enough to quickly fix before moving on to other tasks I thought, so I got to debugging.

When looking at the original Lua code that sets up the candles, my first observation was that the candles were first being attached to the chandelier actor and their position was set afterwards. Perhaps something was going wrong with the offsetting of attached actors even after JoseJX's recent fixes? This turned out to be a false lead when I noticed that no calls were being made to sprite drawing functions at all for the candle sprites. Even if the sprites were positioned out of view, the current ResidualVM implementation should attempt to draw them. Later it turned out that the candle actors were in fact in the correct positions.

In the EMI engine, sprites are components of chores. A chore is basically a track of instructions for the components that are executed in sequence. Only the components of active, playing chores are updated and drawn. Chores are components of costumes, which in turn are components of an actor. I found out the candle actors and their costumes were present like they should be, but the costumes were not playing any chores with sprite components, so no sprites were drawn.

This seemed weird to me. The Lua code is supposed to start the "flame12fps" chore for the candles, but the call to start the chore was never made to ResidualVM. The next step was to figure out why.

The original Lua only starts the chore in the case if no chores are already playing. But surely there shouldn't be any chores playing if the actor was just created? Well, it turned out that when the game is run in ResidualVM, there is.

By adding a breakpoint to the IsChorePlaying engine opcode that the check in Lua calls for each chore, I found out that the opcode returns true because the "wear_default" chore of the costume "dumbshadow" is playing. Because of this, the sprite animation is never started.

In the original engine the chore is not playing. This is easy to check by running custom Lua code with Ctrl+E after enabling the hidden debug functions in the game (I could explain how to do this in a later blog post). If the chore is forced to play, IsChorePlaying will also return true in the original engine, so there is no special handling in the engine to always return false for this particular chore.

Ok, so what is the "wear_default" chore of "dumbshadow" and why is it started then? The "dumbshadow" costume is used to produce fake shadow effects such as the ones that can be seen under Guybrush and Elaine in the above screenshot of the original game. The shadows currently don't show up in ResidualVM, but even if they did, we probably wouldn't want the candles to have shadows. Thus it seems likely that the correct behavior would be to not activate the shadow, like the original engine seems to do.

The Lua code that starts the shadow chore can be found in _actors.lua. The chore is started as soon as the actor is put in a set, if certain conditions are fulfilled. Among these conditions is one peculiar one. If the opcode GetActorPuckVector returns nil, the shadow won't be activated. When GetActorPuckVector is run on the candles in the original engine, the returned value is nil. In ResidualVM the opcode always returns a non-nil value.

Finally we're getting to the gist of the bug, after seemingly drifting so far. GetActorPuckVector is an opcode used to get the forward vector of an actor projected to the actor's current sector (or walkplane) to be used for movement. It appears that in the original engine the GetActorPuckVector opcode always return nil until a call is made to SetActorFollowBoxes, which constrains the actor's movement to the walkable sectors. Most likely the purpose of the nil-check is to only activate shadows for actors that are constrained to walkable sectors.

Replicating this behavior in ResidualVM's implementation of GetActorPuckVector fixes the candles, as expected. Phew!

Wednesday, June 18, 2014

The FASTDYN light mode

One more quick post about the lighting modes before I move on to other subjects.

Looking at the comparison shots in the previous post gave me an idea about the FASTDYN lighting mode. The FASTDYN lighting appears smoother when compared to NORMDYN, and it seems to also light the back side of models slightly. These properties reminded me of the Half Lambert lighting technique used in the Half-Life games.

I decided to quickly implement the technique to see how it compares with the original. Surprisingly in some cases the result is almost an exact match, but in others the shading seems too bright. For example, see Otis  in the screenshots below. Left is the original renderer (FASTDYN mode), and on the right is my implementation with the Half Lambert technique.
The lighting is close to the original when Otis is at about a 45 degree angle to the light coming from the windows. However, if we rotate Otis slightly this no longer is the case.
Otis is now at about a 90 degree angle to the light, but the shading seems much darker in the original. If we rotate Otis 45 degrees further, the lighting is once again very close to my Half Lambert implementation.
Otis is now facing away from the light coming from the direction of the windows.

This behavior seems fairly strange to me. There must be some additional term in the FASTDYN lighting model that I'm not aware of yet.

I may return to this at a later time, but right now I'm happy with my current implementation that matches the NORMDYN mode of the original game exactly. This was just recently merged to ResidualVM's master, so give it a try.

Thursday, June 12, 2014

Lighting comparisons

I submitted a pull request for lighting in EMI. I'm currently well ahead of my GSoC schedule, so I now have some time for ironing out any last remaining issues related to animation and lighting implementation before moving on to post mid-term tasks. See my roadmap on the ResidualVM wiki.

Regarding lighting, I spent some time trying to figure out the FASTDYN lighting mode I discussed briefly in the previous post, but I wasn't able to replicate the look of the the original. The FASTDYN lighting seems less precise and was probably used only for performance optimization, so I decided it wasn't really worth it to spend more time on it. Modern machines can handle the more accurate per-vertex lighting calculations for all actors just fine, and at least to my eye the results look better.

Here are a few more comparison shots, this time without any cheating. Original on the left, ResidualVM on the right.

Mr. Cheese uses the FASTDYN lighting mode in the original, so minor differences can be seen above.
The lawyers use FASTDYN mode. There also seems to be a ResidualVM-specific bug visible here, the lawyers are missing their eyes!
The voodoo lady uses FASTDYN mode which causes minor differences. The lack of head turning is also quite distracting here. I'll work on that after the GSoC mid-term.

Monday, June 2, 2014

Lighting: first results

My work on animations has been merged back to ResidualVM's master branch, so I've now moved on to the next big thing on my task list, which is lighting. So far I have a basic implementation working that supports ambient, point and directional lights. Below is a comparison showcasing the lighting in the original game and my implementation in ResidualVM. Can you spot the difference?


(To be completely honest I did cheat a bit in the above image, though. EMI has several different lighting modes that can be set per-actor. So far I've only focused on the LIGHT_NORMDYN mode, but in addition there is also LIGHT_FASTDYN, which is faster but the lighting is less accurate. Otis and Carla use the LIGHT_FASTDYN mode in the original so the lighting looks a bit different. For the screenshot of the original game I forced LIGHT_NORMDYN for Otis and Carla by executing custom Lua code in the original engine.)

My first attempt was to try to tweak the parameters of the standard OpenGL fixed function lighting model in order to match the lighting in the original EMI. I soon realized it was impossible to get an exact match with this approach, though. For example, EMI uses a simple attenuation model where each light has a minimum and a maximum falloff range. Vertices within the minimum range will be fully lit. Between the minimum and maximum range the light falls off linearly, and at the maximum range vertices will be unlit. OpenGL uses a different attenuation model that can only approximate the model used in EMI.

How did they do the lighting in the original game, then? Back then, GPUs with a programmable pipeline were not yet common, so shaders were out of question. Running apitrace on the original game reveals that no calls are made to glLight functions, so it looks like the original game does not make use of the fixed function lighting either. Instead, it seems the original game calculates shading in software, and the shading is then baked in to the vertex data that is passed on to OpenGL for rendering.

Isn't this inefficient? Yeah, but not really. The models in EMI are fairly simple, and there is only a few of them in view at once. Many actors use the LIGHT_STATIC lighting mode, which means that lighting only needs to be calculated once for them. Only a fraction of actors use the dynamic lighting mode, in which case the lighting must be recalculated each frame. On modern hardware the main bottleneck is perhaps the data transfer from CPU to GPU, as the vertex data needs to be updated every time the lighting changes.

I decided to implement a software shading solution similar to the original game, and the result can be seen in the image above. This is ideal for the software and fixed function OpenGL renderers in ResidualVM, but certainly isn't the best solution on modern hardware. For the modern shader-based OpenGL renderer it's a better idea to use a shader instead, at least for dynamically lit models.

My current lighting hacks can be found be found here.